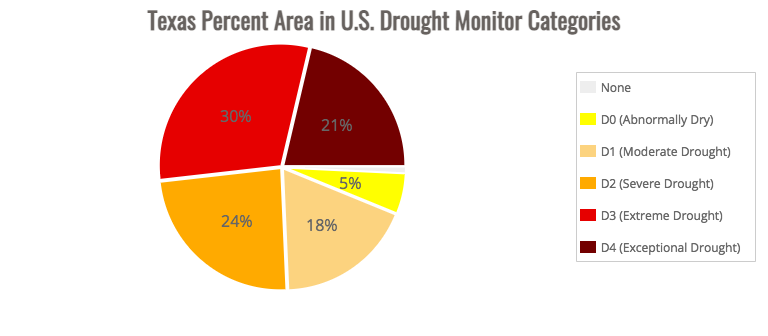
Drought, wildfires, low or no flow rivers, watering restrictions, electrical grid challenges and diminished insect populations are defining summer in Texas. According to the U.S. drought monitor, 93% of Texas is suffering from a lack of moisture, with 75% of the state in various stages of drought ranging from severe to exceptional.
Graph via National Drought Mitigation Center University of Nebraska-Lincoln
In San Antonio, 36 days have hit triple digits this year, setting a new record for 100-degree days. The city normally averages just three such days through July 13. That’s on the heels of the hottest May and hottest June ever recorded. As local TV station KSAT noted, “How many more records can we break?”
We can’t change the weather, so why not make the most of it? The high temperatures present an opportunity to leverage the sun and reboot your landscape with solarization, an easy, chemical-free method that kills grass and weeds and sets the stage for establishing a pollinator habitat.
Solarization offers a low-cost, low tech, low impact, organic approach to weed removal and bed prep. Its modus operandi: kill turf and weeds by smothering, almost pasteurizing, the soil.
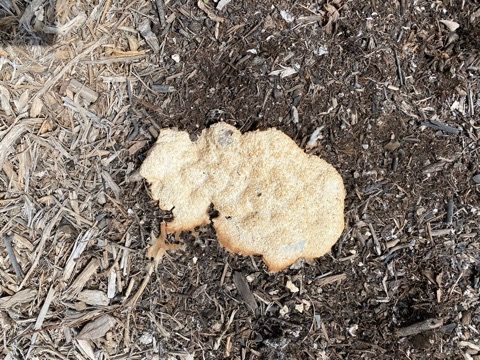
Dog vomit slime mold–nothing to be alarmed about. –Photo by Monika Maeckle
How? Cover the landscape with cardboard and pile it with mulch. This raises the temperature to 140 degrees–hot enough to kill most undesirable organisms by “cooking” the earth–similar to what occurs in a compost pile.
Solarization makes for a pressure cooker, killing pathogens, nematodes, weed seeds and seedlings. It also ensures darkness and makes photosynthesis impossible while expediting the breakdown of organic material, which results in soluble nutrients and desirable fungi for future plants.
The process can take as little as three – six weeks, which is why summer is an excellent time to do it. And with this year’s record high temperatures, the process will likely be more effective than usual. Your beds will be ready for an early fall planting, when the sun retreats a bit.
In the course of solarizing you may encounter the common Fuligo septica, a harmless slime mold also known as dog vomit slime mold or scrambled egg slime because of its yellowish coloration. The organism, actually more of an amoeba than a mold, feasts on dead organic material and recycles nutrients back into the soil. While a bit off putting, it’s a good thing. The slime mold is harmless to humans and often appears on mulch after heavy rains or thorough waterings.
I’ve tapped solarization to conduct “turf to bed conversions” several times in recent years. An expanse of St. Augustine in San Antonio morphed into a vibrant butterfly garden within two years. A plot of Bermuda grass in front of an Austin apartment transformed into another pollinator haven in just six months. More recently, we converted a former factory barn and parking lot to an edible landscape, beehive domicile and flower powered pollinator garden.
 From grass...


Want to try solarization? Here’s how to do it
1. Identify the area to be solarized and mow or weed-whack it as low to the ground as you can.
2. Locate cardboard, the larger pieces the better, and lay atop the area to be solarized. If no cardboard is available, substitute newsprint destined for the recycling heap. Six – 10 layers of newspaper should suffice. Many solarization directions call for black plastic to turn up the heat on the soil. You can use plastic, but then you’ll have to remove it later. And when you do, it disrupts the soil. As a lazy gardener, I prefer materials that simply decompose. Cardboard appears to last about two years before it breaks down.
3. Water the cardboard/newsprint so it doesn’t fight the breeze and will stay in its assigned place.
4. Cover cardboard with four-six inches of mulch.
5. Water again thoroughly and wait. In four- six weeks, you can start planting. You can also plug in transplants immediately, by carving a hole into the cardboard. Just be sure to water thoroughly.
While the soil cooks and solarization takes place under the mulch and cardboard, plan your future garden. Check out the guidelines for our Pollinator Habitat Initiative–at least six different native species, three host and three nectar plants. And feel free to register your habitat on our map.
Solarize now, install your pollinator habitat in September and your landscape will be putting out late season blooms just as migrating monarch butterflies move through the area on their southbound migration this fall.
Tips
1. Be sure to remove any plastic packing tape from the cardboard boxes as they create a future hazard. It’s tedious, yes, but leaving it on will dog you later, when you stab your shovel into the soil and hit the plastic snag. When you pull the tape, it disrupts your garden, making a zip line as it rips across the bed.
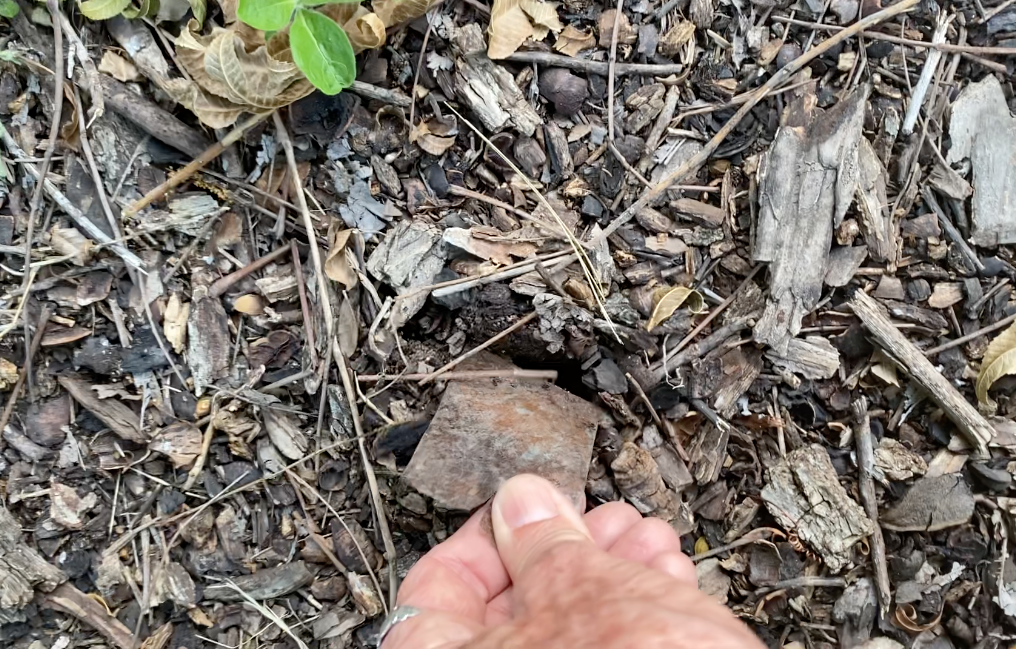
Tape left on cardboard boxes can surface years later. This one was five years old. When you pull it out, it rips the soil like a zip line. Better to remove before covering with mulch. –Photo by Monika Maeckle
2. Cardboard foraging can be fun and gratifying. A used office furniture outlet is a favorite cardboard trove in my neighborhood. Bike shops and appliance distributors are also good prospects, as they constantly receive goods packed in cardboard for protection during shipping. The larger boxes are desirable and cover more ground, but regular boxes from your Amazon shipments or the grocery store are fine, too. You’ll just need more of them.
3. If you utilize “FREE” mulch, sometimes supplied by city government, check to make sure it is also free of microplastics. We tried the City of San Antonio’s free mulch several times and were dismayed at the microplastics trash ground up and included at no charge. Bits of plastic bottle tops and other disposables riddled the mix. Better to pay for organic mulch or some other commercial product that is not laced with plastics and other harmful soil additives. Most mulch is quite affordable.
4. Bags or bulk? When considering whether to buy bags of mulch or have it delivered in bulk, it depends on the scope of your project and the availability of labor. Either way, you’ll have to spread the mulch around with a rake or shovel. For large projects, bulk delivery is more cost effective, especially if you have helpers.
Good luck! Let us know how your solarization project turns out by leaving comments below.
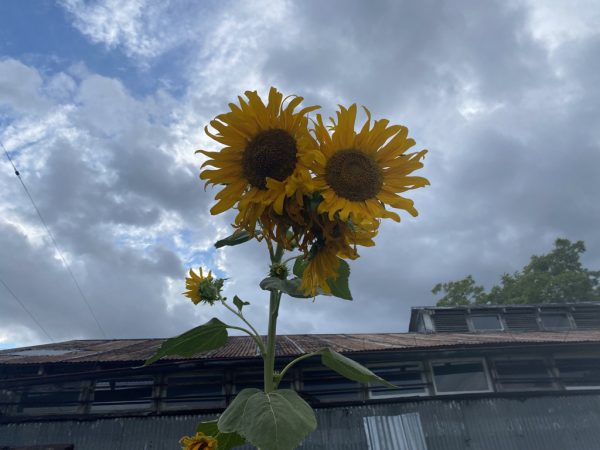
Top photo: Multi-headed sunflower attracts pollinators and others’ attention at Wherehousebarn in San Antonio. –Photo by Monika Maeckle
Related posts:
- Dejavu: Is 2022’s dry spring setting stage for another Texas drought like 2022?
- Wherehousebarn pollinator rain garden beckons wildlife and tenants in San Antonio
- Gayfeather snags 2022 Unofficial Pollinator Plant of the Year
- How to plan a successful butterfly garden
- Mostly native butterfly garden outperforms lawn every time
- How to plan and plant a successful pollinator garden
- Pledge to plant a pollinator garden in San Antonio
Like what you’re reading? Follow butterfly and native plant news at the Texas Butterfly Ranch, like us on Facebook, or follow us on Twitter, @monikam.
Would this method work to kill bahia grass? (Hay field)
Thanks
Definitely, it’ll kill anything under it. The only problem I have found is, eventually, weed seeds will blow their way into your cleared area.
I have no shortage of insects in my condo. Little cockroaches are driving me crazy.
Wonderful, Monika. Wish this would appear in EVERY Texas newspaper!
Ive read that perennials often don’t like to be surrounded by a lot of mulch. I did a sheet mulching project a few years ago and it does seem like the plants that are more surrounded by mulch aren’t thriving. Do you have any thoughts on that? 4-6 inches seems like a lot before hitting soil. Thank you!
We’ve had cardboard and heavy mulch in the beds around our house since fall. The weeds, esp. nutgrass, are thriving. ;( We are now laying plastic sheeting w mulch on top, to keep it in place. Nutgrass is still coming thru.
Am I being impatient? Do I just need to wait for summer? HELP!
Don’t recommend plastic as it pollutes the soil and NEVER goes away. Small pieces break down and it’s detrimental overall. Use something that breaks down and feeds the soil. Try some 30% vinegar on the nut grass when it’s growing to knock it back or pull them out. Good luck! —-MM